F = Fixable — apply a remedy
P = Partially fixable — depends on severity
N = Cannot fix — remake required
Problem 01
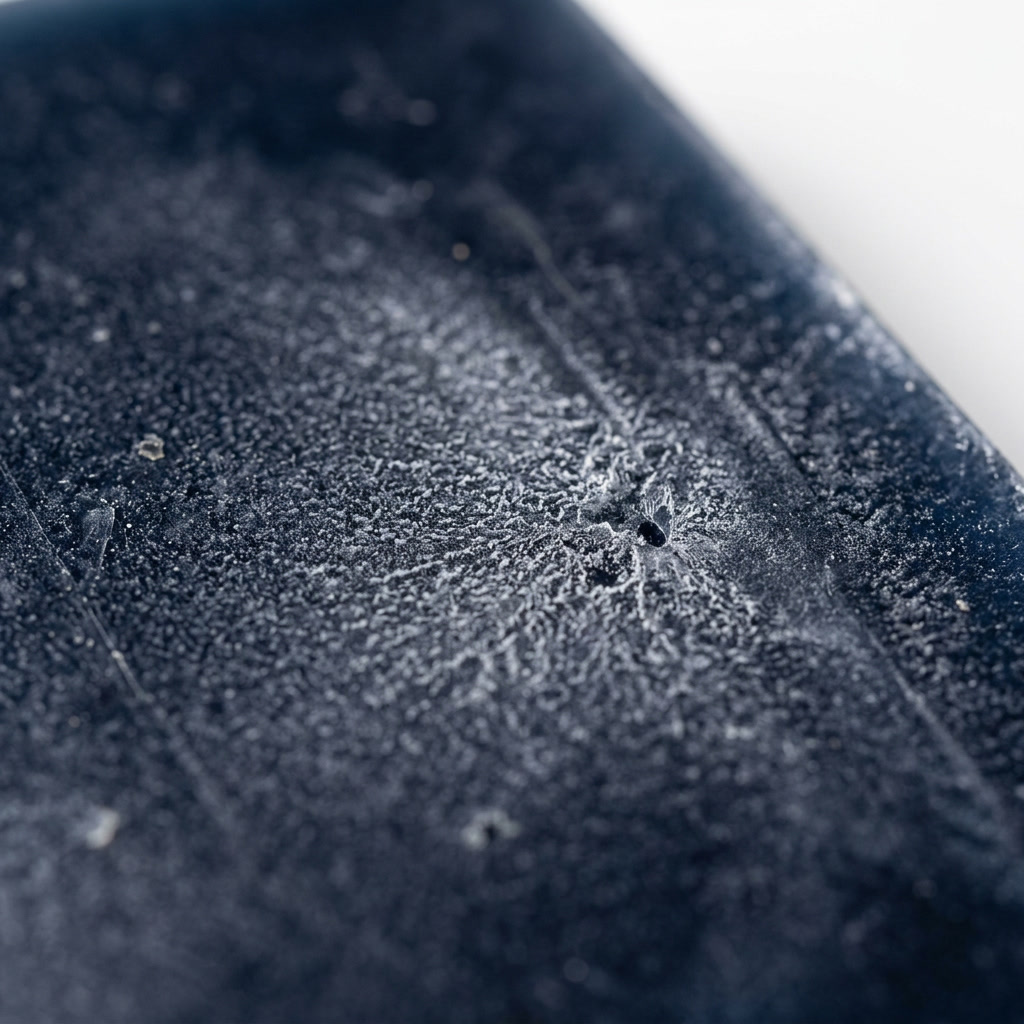
Amine Blush — Greasy Film on the Surface
F
Most likely causes
- Humidity above 50–60% during cure — amine hardener reacts with atmospheric moisture
- Cold curing temperature (below 22°C / 72°F) — slow cure gives amines more reaction time
- Thin pours — less exothermic heat means more exposure time to air
- Gas-fired heaters in the workspace — introduce extra CO₂ and moisture
- Covering pieces too tightly — traps moisture against the surface
How to identify it
- Waxy or greasy drag when you run a finger over an apparently cured surface
- Dull, slightly opaque sheen where gloss is expected
- White spotting or salt-like crystals in humid conditions
- Next coat fails to bond — amine blush acts as an invisible release agent
- Sanding makes it worse — pushes blush deeper into the surface
Fix: Wash the surface with warm soapy water (dish soap works well) and a Scotch-Brite pad. Rinse and dry completely. Do not sand first — wash first, sand after. Once clean, sand lightly for tooth and pour a fresh coat.
Next time: Work at 24–30°C (75–85°F) with humidity below 50%. Run a dehumidifier. Avoid gas heaters. Cover curing pieces with a box or tent that allows some airflow. Apply the next coat while the previous layer is still within the recoat window (slightly tacky) to skip the issue entirely.
Problem 02
Resin Pulling Away from Edges
F
Most likely causes
- Surface tension — liquid resin naturally contracts toward the centre
- Surface contamination at edges: silicone, wax, fingerprint oils, or tape adhesive
- Insufficient resin volume — too thin to maintain edge coverage
- Porous substrate (wood, MDF) absorbing resin before it can level
- Canvas sagging under resin weight, pooling resin at centre
Common surfaces affected
- Canvas and wood panels — edges lose coverage first
- Tumblers — top lip and base frequently pull back
- Tile coasters — smooth glazed surface resists adhesion at edges
- Pendants and small pieces — high perimeter-to-surface ratio
- Any piece where silicone or acrylic medium was used nearby
Fix: Pour a second coat after the first has cured — edges almost always fill in on a second pass. Apply painter's tape dams around edges before the second pour to physically contain the resin. The fix is almost always more resin.
Next time: Clean all surfaces thoroughly with isopropyl alcohol before pouring, especially if silicone or acrylic pouring mediums were used nearby. Seal porous surfaces with a thin seal coat first. Use a resin calculator and mix slightly extra. For canvas, mount on a cradled wood panel rather than a stretcher bar.
Problem 03
Orange Peel Texture
F
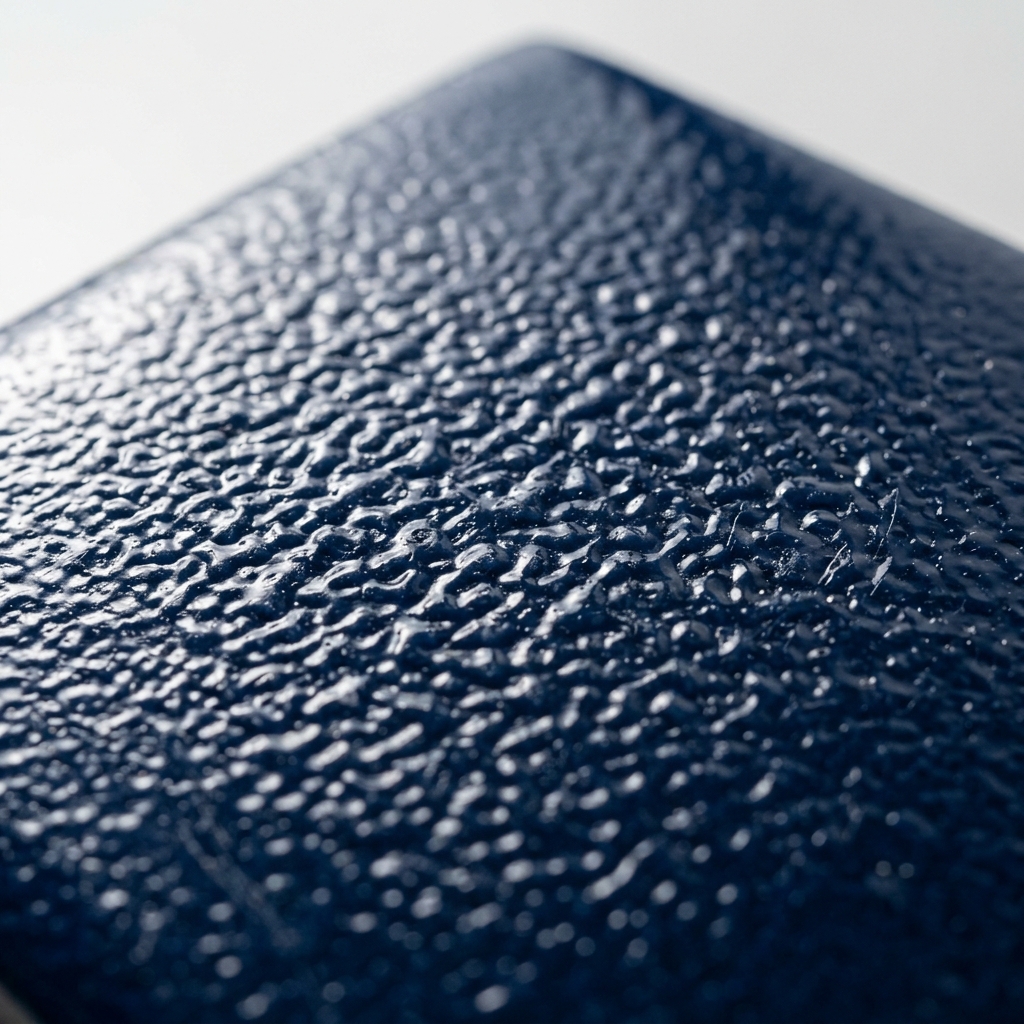
Most likely causes
- Substrate contamination — wax, oil, old coatings preventing even wetting
- Cold resin — high viscosity prevents self-levelling before cure kicks in
- Too thin a coat — insufficient material to flow and self-level
- Working past pot life — resin already thickening when poured
- Micro-bubbles bursting late in cure when resin is too viscous to fill craters
Different from other texture problems
- Orange peel: overall bumpy surface, small rounded undulations
- Dimples: individual circular craters from contamination
- Brush marks: linear texture from application tool
- Tide marks: level-related lines and pools
- Fish eyes: larger circular voids with raised edges
Fix: Allow full cure (48+ hours). Block-sand flat with 120–150 grit. Vacuum all dust, wipe with denatured alcohol, and pour a fresh flood coat at adequate thickness (minimum 3mm). For mild cases, wet-sand 2000+ grit and finish with automotive polishing compound.
Next time: Degrease the substrate with acetone or an epoxy-specific cleaner before pouring. Warm resin components in a warm water bath before mixing to reduce viscosity. Pour at 3mm minimum thickness — self-levelling requires adequate material. Work within the resin's pot life.
Problem 04
Over-Torching Damage
P
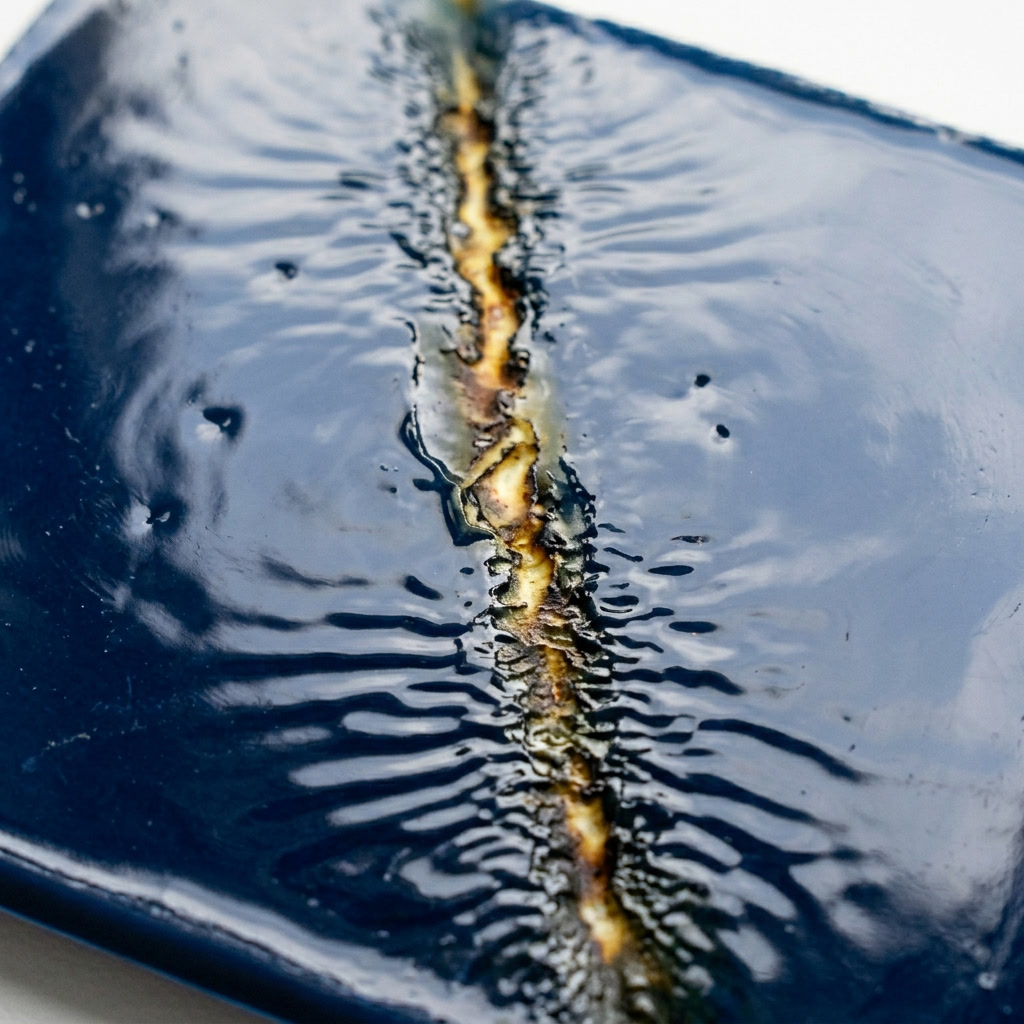
Most likely causes
- Torch held too close to the surface (under 10cm / 4 inches)
- Lingering too long in one area instead of sweeping continuously
- Too many passes over the same spot
- Using a powerful propane torch instead of a small butane torch
- Working in a cold room and torching more aggressively to compensate
Damage spectrum
- Minor: shallow dimples and wave pattern — sandable and recoatable
- Moderate: colour shift in the affected zone — partially fixable
- Severe: brown or black scorch marks — may require full remake
- Artwork damage: if resin scorches through to artwork beneath — not fixable
- Smoke during torching is the warning sign — stop immediately
Partial fix: For minor dimples and waves: allow full cure, sand with 80-grit to level the damage, clean all dust with IPA, and pour a fresh coat. For severe yellowing, scorch marks, or damage to underlying artwork: full remake is likely required.
Next time: Hold the torch 15–20cm (6–8 inches) from the surface. Always keep it moving in slow, sweeping ironing motions. One or two full passes is enough — then stop. Use a small butane torch (easier to control). Pre-warm resin to reduce bubbles so you are not tempted to over-torch. Less is more.
Problem 05
Warping and Bowing of the Substrate
P
Most likely causes
- Resin applied to one side only — differential tension between sealed and bare surfaces
- Thin, unbraced panels lacking structural rigidity to resist resin weight
- Canvas stretcher bars unable to support the weight of a resin pour
- Incomplete cure — piece removed from a level surface too early and bent
- Heat exposure after curing (above 50°C / 120°F) softening the resin
Thin castings (bookmarks, coasters)
- Incomplete cure is the main cause — allow minimum 72 hrs, ideally 7 days
- Wrong mix ratio or over 6% colorant leads to permanently flexible resin
- Thin casting resins need full cure time before demolding
- Warped thin pieces can sometimes be flattened under weighted heat
- Prevention: always use a cradled wood panel as base substrate
Partial fix: For panels: apply a thin coat of resin to the back to equalise tension — this is the most reliable fix. For thin castings that have warped: allow additional cure time; gently warm with a heat gun, flatten on a level surface under heavy weights and let cool. Results vary.
Next time: Always seal both sides of wood panels. Use cradled birch panels or thick art boards instead of thin plywood. For canvas, add a rigid cardboard support behind the fabric before pouring. Wait a minimum of 72 hours (ideally a full week) before demolding thin castings.
Problem 06
Soft Spots — Localised Incomplete Cure
P
Most likely causes
- Incomplete mixing — pockets of unmixed resin or hardener that never cross-linked
- Scraping the last drips from the mixing container — residue on walls is often unmixed
- Colorant exceeding 5–6% by volume — dilutes the chemistry in localised areas
- Water-based colorants (acrylic paint) introducing moisture that disrupts the cure
- Cold spots in the workspace causing uneven curing rates across the piece
Soft spot vs fully sticky surface
- Soft spot: isolated gummy patch — localised mixing or contamination issue
- Fully sticky surface: entire piece tacky — ratio, temperature, or humidity problem
- Soft spots often appear where scraping residue was poured from the cup
- Nail test: press firmly — fully cured resin leaves no impression
- If in doubt, wait another 24 hrs at 24°C before deciding it is a soft spot
Partial fix: Scrape off all soft, gummy material completely — uncured resin cannot be restarted by pouring over it and will leach through new coats. Clean with IPA, sand surrounding cured areas for tooth, and pour fresh properly-mixed resin. If widespread, the entire layer may need stripping.
Next time: Mix for a full 3–5 minutes, scraping sides and bottom of the container throughout. Use the double-cup method: transfer to a second clean container and mix again for 30 more seconds. Never scrape the last drips from the mixing cup. Use only resin-compatible colorants and keep total colorant under 6%.
Problem 07
Colour Fading and Pigment Degradation
N
Most likely causes
- UV light exposure — sunlight breaks down dye molecules through photodegradation
- Non-lightfast colorants — cheap dyes, food colouring, and many alcohol inks
- Alcohol inks in pink/purple range are especially vulnerable — can disappear entirely
- Exothermic heat during cure destroying sensitive dye molecules
- Fluorescent and neon pigments have inherently low UV stability
Which colours fade fastest
- Pinks, reds, and purples — least lightfast across all colorant types
- Fluorescent and neon shades — fade within weeks in sunlight
- Alcohol inks in general — fading depends heavily on brand and specific colour
- Blues (especially ultramarine) and earth tones — most lightfast
- Mica powders and epoxy pigment pastes — the most stable options overall
Cannot fix: Once pigment has faded, it cannot be restored. A fresh coloured coat can be poured over the piece, but the original work is lost. Prevention is the only strategy.
Next time: Use mica powders or epoxy-specific pigment pastes as your primary colorants — they are the most UV-stable. If using alcohol inks, choose tested lightfast brands and apply a UV-stabilised seal coat before encapsulating. Use UV-stabilised resin. Display pieces away from direct sunlight or behind UV-filtering glass.
Problem 08
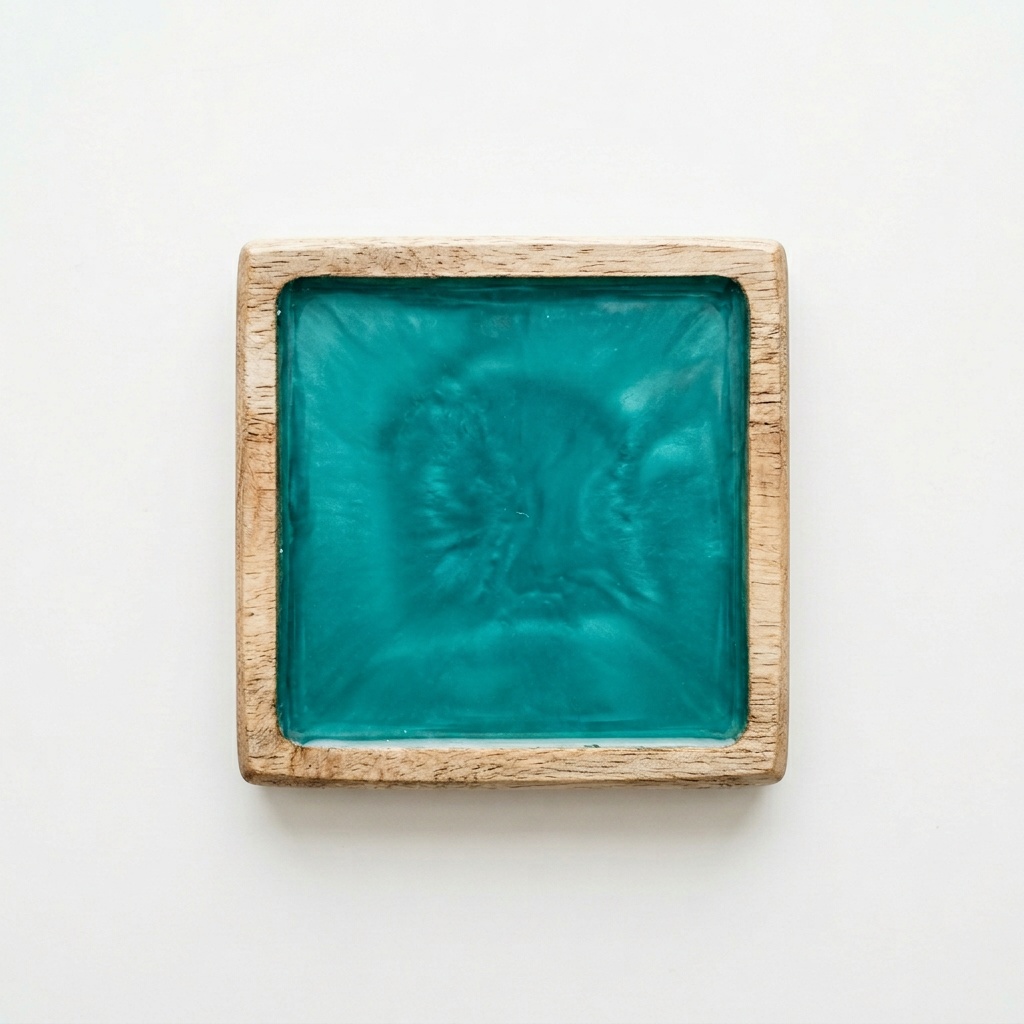
Resin Shrinkage — Concave Surfaces and Gaps
P
Most likely causes
- All epoxies shrink 1–5% by volume during cure — inherent to the chemistry
- Thick pours generate more heat, causing expansion then contraction on cooling
- Resin filling knots and voids in wood sinks below the wood surface as it cures
- River channel: resin level drops below wood after full cure
- Poor-quality epoxy containing solvents that evaporate and increase shrinkage
When shrinkage is most noticeable
- Deep casting pours — more material means more volume change
- Filling wood knots and voids — resin always sinks slightly below wood surface
- River tables — expect resin to sit slightly lower than wood after full cure
- Moulds — resin may cure with a concave top surface rather than flat
- Thin coatings shrink less visibly — less total volume change
Partial fix: Pour a top-up coat to fill depressions after the initial pour has fully cured. Slightly overfill moulds to account for expected shrinkage. For wood voids and knots, slightly overfill and wait a full 4–7 days before sanding flush so all shrinkage has occurred before levelling.
Next time: Treat shrinkage as a normal part of the process rather than a failure, especially in mould work and river tables. Always plan for a second top-up pour. Use high-quality epoxy without solvents. For deep pours, use a purpose-made deep casting resin — it generates less heat and therefore less thermal contraction.
Problem 09
Surface Scratches on Cured Resin
F
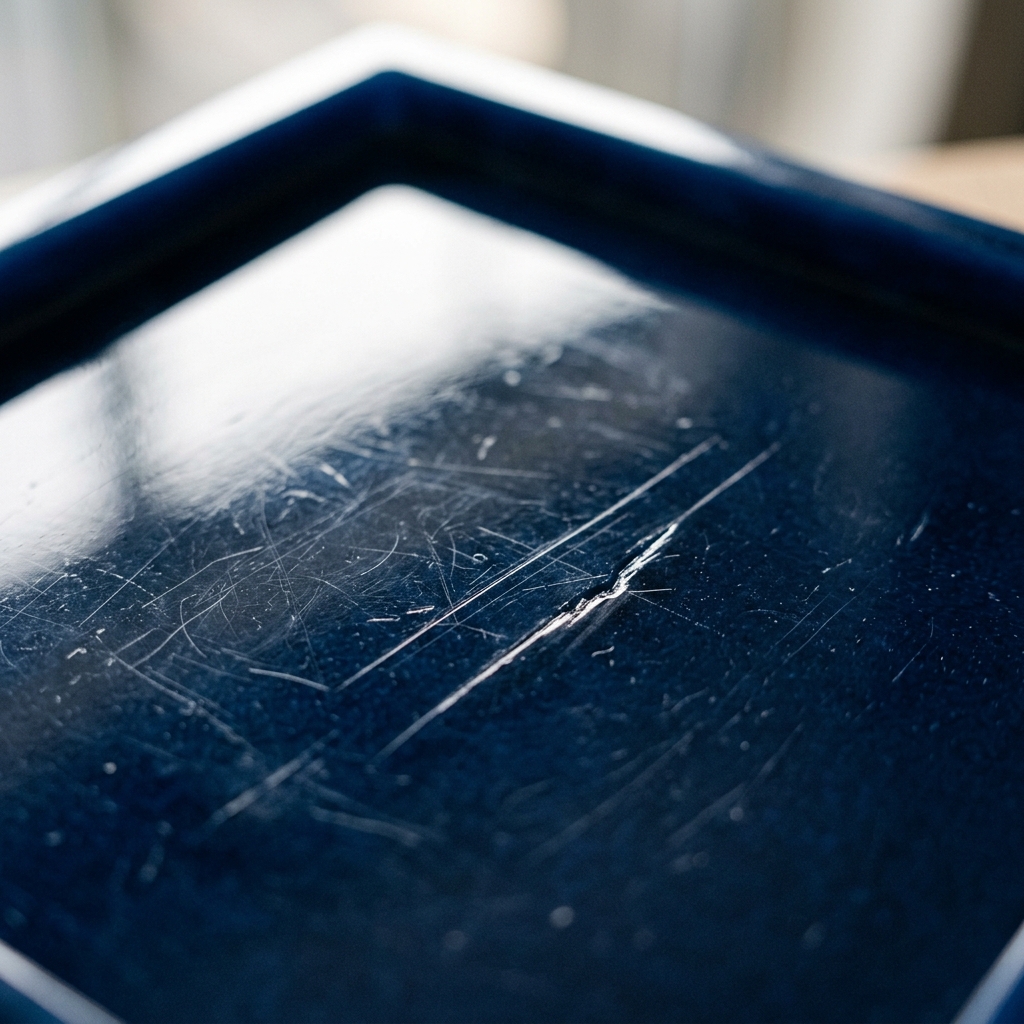
Most likely causes
- Everyday contact with keys, dishes, utensils, or hard objects on functional pieces
- Cleaning with abrasive pads, scouring powder, or rough cloths
- Dragging objects across the surface instead of lifting them
- Softer resin formulations — some brands cure harder than others
- Excessive colorant (over 6%) reducing the hardness of the cured piece
Scratch depth guide
- Hairline: only visible under a light — polishing compound alone is sufficient
- Light: visible in normal light — wet-sand 2000-grit then polish
- Medium: catches a fingernail — wet-sand 800 → 1500 → 2000 then polish
- Deep gouge: clearly visible — fill with fresh clear resin, cure, sand flush, polish
- Widespread fine scratching: sand entire surface and pour a fresh flood coat
Fix: Hairline scratches: polish with automotive compound (e.g. Meguiar's Mirror Glaze) and a soft cloth. Medium scratches: wet-sand 800 → 1500 → 2000 grit, then compound and buff. Deep gouges: apply a drop of fresh clear resin with a toothpick, cure, sand flush, then polish. Widespread damage: pour a fresh flood coat after sanding.
Next time: Use coasters and trivets on resin surfaces. Clean only with mild soap, water, and a soft cloth. Never use acetone, bleach, or abrasive cleaners on finished resin. Store pieces with felt pads under the base. Handle with care during photography — fingerprints show every scratch.
Problem 10
Resin Not Bonding to the Substrate
P
Most likely causes
- Surface contamination: fingerprints, furniture polish (silicone), wax, or acrylic medium residue
- Smooth, non-porous surfaces (glass, polished metal) — no mechanical tooth for adhesion
- Moisture in or on the substrate — wet wood, damp surfaces prevent bonding
- Amine blush on a previous resin layer — acts as a release agent if not washed off
- Stearated sandpaper leaving waxy residue that repels resin
Materials that resist resin bonding
- Polyethylene and polypropylene (including most squeeze bottles and containers)
- Silicone — resin will not bond under any circumstances
- Teflon (PTFE) — used intentionally as a release surface
- Glazed ceramics and coated tiles — insufficient surface texture
- Previously waxed or oil-treated wood — must be sanded completely through the wax
Fix (requires rework): Remove all failed resin completely. Clean the substrate with IPA or denatured alcohol and allow to dry fully. Sand smooth surfaces with 80–120 grit to create mechanical tooth. Apply a thin seal coat, cure, then apply the main coat. The piece essentially needs to be redone from the substrate up.
Next time: Wear nitrile gloves throughout — skin oils are enough to cause delamination on small pieces. Degrease all surfaces with IPA before pouring. Sand smooth substrates. Apply a seal coat on all porous materials. If layering over cured resin, either work within the recoat window or sand and degrease first. Test adhesion on a scrap piece when working with an unfamiliar substrate.
★ The complete library
15 failure cases — and the Diagnosis Card to keep at your workbench
The Epoxy Resin Art includes the full troubleshooting library — 5 additional cases not shown here, the printable Diagnosis Card in flowchart form (symptom → cause → fix → prevention), the Pre-Pour Master Checklist that prevents most of them, and the complete Studio Toolkit.
View on Amazon → Have the book? →
+ 5 more cases
Including cratering, micro-bubbles in deep casts, lifting on canvas, fish-eye contamination, and dimpling.
Including cratering, micro-bubbles in deep casts, lifting on canvas, fish-eye contamination, and dimpling.
Diagnosis Card
All 15 cases in a single 3-page printable flowchart for fast in-pour decisions.
All 15 cases in a single 3-page printable flowchart for fast in-pour decisions.
Full Studio Toolkit
Pre-Pour Checklist, Brand Comparison, Temperature Chart, and 5 more companion tools.
Pre-Pour Checklist, Brand Comparison, Temperature Chart, and 5 more companion tools.
Have a problem not covered here?
Join the Studio Notes newsletter →New troubleshooting cases and reader questions answered monthly.